bricklaying
Masonry

Brick Laying Basics

Brick Layer Perth WA is a highly skilled craftsman. Using the right tools and materials and paying attention to alignment and leveling will create a sturdy and visually appealing structure.

Set up your gauging rods (or guidelines) for your first brick row. Alternate every new row with half bricks on both ends to stagger the joints.

bricklaying

Bricklaying requires several materials, including bricks, mortar, a line block, and a spirit level. Line blocks ensure that each course of bricks is set at the correct height. They are attached to either end of a mason’s line that runs the length of a wall, with the top of each brick in a course touching the line. This helps to keep the wall straight and stable.

A line is also useful for ensuring that a wall is plumb or vertical, which makes it stronger and more attractive. A spirit level is the best tool for this purpose, although a plumb bob can be used to verify that a line is perfectly horizontal. A mason’s line should be attached to a brick at each end, and its position should be checked with the spirit level after each course of bricks is laid.

Mortar is the binding agent that holds the bricks together. A good mortar mix is comprised of three parts sand and one part masonry cement. The sand should be a fine grade known as builders sand, and it should be mixed with the cement in a wheelbarrow or mortar mixer, following the manufacturer’s instructions. Once the mixture is sufficiently thick, it should be brushed through a joint to smooth it.

The first row of bricks is called a ‘course’, and should be laid on the foundation with mortar. It is important to stagger the joints on this first course to avoid a line of weakness running through the structure.

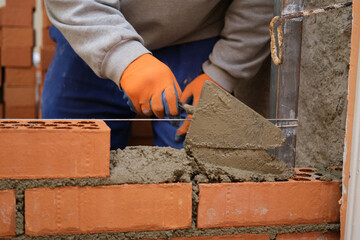
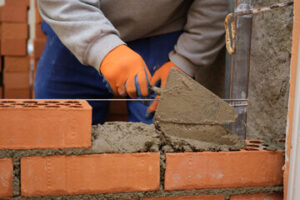
When laying each course of bricks, it is essential to butter them well. This involves spreading a thin layer of mortar over the side of each brick, which will help to bed it into the mortar. It is also important to check the level and plumb of each brick with a spirit level and line block, tapping each brick gently with a trowel handle to make sure that it is firmly set.

If a brick needs to be cut, this should be done on solid ground with a bolster chisel and lump hammer. If the resulting joint is uneven or rough, it can be struck with a “jointer” when the mortar has begun to set.

If your wall will be a freestanding structure, you must pour a concrete foundation before you begin laying brick. This foundation needs to be the exact size and depth of the finished brick wall, which should be built on top of it. If you do not want to pour a concrete foundation, you can use a brick ledge or footing. Once the foundation is ready, you must set guideposts, also known as gauging rods, which are long pieces of timber which help you lay your wall straight. These should be as long as the height of your first course and should be set in the ground at each end of the wall. Use a spirit level on the end of these to mark the level of your first row of bricks, and check with each new course that it is completely even.

To start laying your bricks, make sure that you have enough mortar, which is made from cement and water. Scoop some of it onto the back of your trowel and spread it on one side and one end of the brick that you are about to place. This is called “buttering” the brick, and it helps ensure that there will be an even bond between the bricks.

Press the buttered brick into the mortar, and use your level to check that it is even with the surface of the ground. If it is not, you should use the end of your trowel to tap down any bricks that are out of place. Continue this process until you have completed your first course of brick.

Before you begin your second course, set up a string line to mark the level of the next row of bricks. This will be a good way to make sure that your wall remains level, as it is easier to make minor adjustments now than after the bricks have been laid.

Start your second course with a half brick at both ends of the wall, and then build up to the next full brick as before. This will allow the joints to be staggered and prevent them from lining up, which can weaken the structure of your brick wall.

Bricklaying is a skill that takes time to master. Many aspiring bricklayers take a part-time course or apprenticeship with a construction company to learn the trade. There are also numerous books on the subject. Bricklayers use a variety of hand and power tools to carry out their work. They may choose to start small and work their way up to larger projects.

Before you begin laying bricks, it is important to prepare the area where they are to go. You will need a solid foundation or ‘footing’ which should be well below ground level. This will help to prevent dampness and frost damage, which can damage the bricks.

A bricklayer will set out a ‘course’ of bricks to be laid, using a string line and pins or clamps to create guidelines. This makes sure that the bricks are properly aligned and spaced. The ‘course’ of bricks will usually consist of soldiers (standing upright), stretchers or headers (laid lengthwise on the wall) and should be staggered.

When the first course is laid, lift up the string line and mark where you will put the next course of bricks. Butter one end of a new brick and the other end of a header brick with mortar. Then, lay them in the correct position. This should be done with a staggered pattern to avoid a weak line of vertical joints.

Once the bricks are in place, a rub down and brush with a ‘jointer’ or ‘rub brick’ is needed to smooth the mortar joint. This will make it easier for the bricks to fit together. A ‘jointer’ can be a piece of copper tubing or wood dowel.

Once the mortar has been rubbed down, it should be left to dry for a while before it is used. This is to ensure that the mortar is hard and can be used. If the mortar is not hard enough it will be difficult to’set’ the bricks in it, and it will sag. During this time, the bricklayer should also use a spirit level to check that all courses are level.

Using bricks and other materials in mortar, a bricklayer constructs walls, partitions, arches and other structures. The trade varies in complexity, from laying a small masonry walkway to installing an ornate exterior on a high-rise building. The process of bricklaying requires great skill and precision. A bricklayer must know how to mix the right amount of mortar, and he should be familiar with a variety of hand and power tools. The job also involves a fair amount of climbing and lifting.

The first step in the process is to plot out the form of a wall or other structure on the ground, using a spirit level and tape measure to ensure accuracy. Depending on the type of structure, a concrete footing may need to be poured and left to dry before bricks are laid. During this phase, it is important to use a line stake and string line for guidance. Once the shape of the foundation has been marked out, it is time to begin laying the first course of bricks.

When the first course is finished, it is essential to check the line of the wall with a spirit level. If any of the bricks are uneven or have a slight dip, these should be lightly tapped with the tip of your trowel. After each row is completed, the spirit level should be used again to ensure that the structure is still level and plumb.

After each course is complete, it is common practice to build up the ends of a wall before filling in the middle. This helps to create a strong and stable wall, which is especially useful if the structure has an arch or curve in it. When constructing a wall, it is also important to ensure that there are staggered vertical joints. This helps to prevent weak points in the structure.

A bricklayer should have a range of trowels, each with its own purpose. A small pointed trowel is perfect for spreading mortar, while a large trowel can be used to lay the bricks. In addition, a number of other trowels are available for smoothing and pointing. A foxtail brush is also necessary for cleaning away excess mortar and removing any rough edges.

Roof Replacement
Roofing Services

Factors That Affect the Cost of Roof Replacement

A new roof can boost your home’s value and prevent problems like mildew growth, wood rot, and leaks. But before you commit to a roof replacement, consider the factors that affect the total cost.Roof Replacement

A drip edge and gutters steer water off the roof. Flashing—a metal strip that prevents leaks where shingles meet other surfaces, such as walls and chimneys—is also important.

The type of roofing material used for a roof replacement can affect the overall cost. Some factors that influence the cost of reroofing a home are out of the homeowner’s control, such as geographic location and weather. However, the choice of shingles or alternate materials is within the homeowner’s control and can affect how much a new roof will cost. A roof’s longevity and the amount of value it adds to a house also depend on the type of materials chosen.

There are many types of roofing materials on the market, from basic asphalt shingles to luxury copper. There are also options for the underlayment, which is a waterproof barrier that’s installed on the roof decking before shingles are placed. The soffits, which are the boards that run along the eaves of a house, are another component to consider when choosing roofing materials, as they can be vulnerable to moisture damage.

Metal roofing is a great alternative to traditional shingle roofs and has been known to last 30 or more years. It can be fabricated to look like wood or slate shingles and may also reduce the need for expensive roof maintenance. However, it’s a heavier option and not ideal for all homes because of its weight.

Clay tiles are a natural roofing material that’s molded and fired for durability. They are a good choice for hot climates, as they reflect sunlight rather than absorb it and can help lower a home’s energy costs. They are a bit more expensive than metal, wood, or asphalt shingles and require a skilled professional to install.

A natural slate roof provides a luxurious finish to a house and can increase its resale value. It is a heavy option, though, and not suitable for every home because it can put too much stress on the structure. Slate is also difficult to repair and can be more expensive than a synthetic slate product.

Asphalt shingles are the most popular type of roofing material. They’re a low-cost option that’s easy to find and has an average lifespan of 20 years. They are sturdy and can withstand winds up to 130 mph, but they don’t provide as much insulation as other options. They are also susceptible to plant and moss growth, which can result in a less-appealing appearance for the roof.

Roofing Style

The roof style of your home plays an important role in its curb appeal and protection from the elements. It’s also a factor that determines how much damage the roof can withstand and the costs associated with it. Steep slopes will help to guide rain, snow, and moisture away from the house, while flat roofs offer a modern flair and can allow for additional living space. Gable roofs have two slopes that meet at a central ridge and are one of the most popular options. They’re also customizable by changing the steepness of the slopes.

Roofing Cost

Roof replacement isn’t a homeowner project many people look forward to, but it’s often necessary for homeowners in order to protect their homes from damage and prevent hazards. Unfortunately, the cost of a new roof can be expensive. Depending on the style, size, and features of your roof, there are several elements that can add up to the total cost of the roof installation.

Roofing materials make up about 40 percent of the roof replacement cost. These include underlayment, shingle types, and the labor needed to install them. This includes nailing the shingles to the wood, applying a protective underlayment, installing roof ridge vents, and more. The pitch of the roof can also affect the price of materials, as steeper pitches require more work to install and may need special equipment or materials to be safely done.

The roof removal and disposal costs can also significantly increase the overall cost of the project. Depending on the size of your roof and whether there are any unique features like skylights, chimneys, or dormer windows that need to be installed or removed, this can add up to a significant amount. In addition, there are often additional fees for things like hauling, dump, and landfill charges.

Many cities and towns require that a permit be obtained for roof replacement. This is primarily to ensure that the new roof meets local codes and is installed properly. Getting a permit can add up to another $500 or so to the cost of your project, but it’s an important aspect of the roof replacement process.

Other factors that can add to the cost of a new roof include the type of roof ventilation you have and whether or not it’s insulated. These factors are outside of your control, but they can affect the amount you’ll need to spend on materials and labor. If you’re concerned about the cost of a new roof, it’s a good idea to get a few estimates from different roofing companies in your area to see how much others are spending on their projects.

Roofing Warranty

The investment you make in a new roof deserves all the protection you can get. Luckily, many reputable roofing contractors offer both manufacturer and workmanship warranties to cover your roof replacement project. Depending on the type of warranty you select, you could be covered for decades. However, it’s important to understand what a warranty actually covers before you sign on the dotted line. For example, a high-end manufacturer’s warranty may include snowfall and hail damage, but if your roof is not maintained properly or by a contractor certified to use the products on your roof, you could find yourself paying for repairs out of pocket.

Another thing to consider is that most manufacturers’ warranties have a limit on how long they will cover the material. Oftentimes, this limited lifetime is only good for the first 10 to 20 years after installation. There are also some exclusions that you should take note of, such as wear and tear and expenses like labor and certain parts.

On the other hand, there are some warranties that only provide coverage for the materials and not the installation of the materials. These types of warranties are commonly offered by a roofing contractor and usually only cover the materials in the event they fail. This is why you need to be aware of the limitations of these warranties and work with a contractor that offers them as well as a workmanship warranty.

If you have a labor-only roofing warranty, be sure to understand the details before signing on the dotted line. These warranties only cover the labor required to repair defective materials. They do not cover the cost of any additional materials that might be needed to fix a leaky roof.

Another thing to keep in mind is that a warranty can be transferred when you sell your home. This is a great way to pass on the peace of mind that a new roof brings to your home to future owners. There are specific rules and regulations that need to be followed in order to transfer a roof warranty, though, so make sure you read the fine print carefully before committing to one.

Roofing
Roofing Services

Types of Specialty Roofing

Roofing isn’t usually seen as the most interesting aspect of a structure, but it says so much more about a building than people might realize. Whether the roof is acting as a highway billboard, a way to build brand identity, or something else entirely, it’s important to choose your roofing material carefully. Roofing

A shake roof is a type of specialty roofing that features shingles made of natural wood. These types of roofs are often used in mountain communities and for rustic homes. They look great on any style of home and come in a variety of colors and styles. They can be more expensive than other types of roofing, but they’re still a good choice for homeowners who want to save money on energy costs or who need extra protection from the elements.

Shake shingles are made from western red cedar, cypress, pine, and redwood trees that are cut into thin sections and then split by manufacturers for use on roofing. They’re shaped and finished by the manufacturer, then sanded for appearance. They’re thicker on the butt end and a bit thinner on the face, so each shake is unique. They are available in a variety of cuts, such as edge grain and flat grain.

They can also be treated with fire retardants and chemical preservatives to prevent rot and decay in certain climates, as well as make them more resistant to fire. These roofs are typically more expensive than asphalt shingles, but they do have a long lifespan.

The wood on a shaky roof can be stained to add color or removed for a more natural look. If you choose to remove the shingles, you’ll need to hire a professional roofing company to replace them.

When installing a shake roof, you’ll need to install a layer of felt underlayment underneath and between each layer of shingles. You’ll also need to choose a shingle type that works with the slope of your roof, and you’ll need to make sure your installers use a three-ply system that includes a felt interlayment between each layer of shakes.

If you’re unsure what type of shingle will work best for your roof, consult with a local roofing contractor who can help you decide on a good option. They can give you a free estimate and walk you through the process of choosing the right roofing material for your home.

Slate roofs are one of the most popular specialty roofing products on the market. Not only is slate a very beautiful material, but it’s also extremely durable and low maintenance.

Slates are naturally textured stone tiles that can come in various shades of green, purple, black, and gray to match the style of your home. They are also fireproof and water-resistant, making them a good choice for homes in humid climates.

A textural style of slate roof mixes slates with different surface textures and varying thicknesses to create an appealing rougher-hewn appearance. It can also be achieved by randomly installing longer slates that project past the butt lines of other slates, a method known as hang-down installation.

Unlike asphalt shingles and metal roofs, a slate roof requires fasteners that are specifically designed for the material. Ideally, copper or stainless steel nails should be used. They should be hammered by hand to ensure they are flush with the slate.

The nails must also be long enough to reach under the slate without getting caught on any part of the underlying structure. This can cause damage to the slate, especially if the nails are driven too deep.

Slate is a heavy material. It weighs about eight to 10 pounds per square foot, which means that it can impose a lot of stress on the rafters of your home. Adding a new frame or retrofitting your existing structure to handle the added weight can be a costly proposition.

If you choose to install a slate roof, it’s important that the installation process is performed by a reputable contractor. Otherwise, you could end up with a roof that will need to be replaced within years.

It’s also important to remember that slate roofs are very fragile, so they should not be walked on too much. It’s also important to have your roof checked on a regular basis to make sure that the tiles aren’t damaged.

Ultimately, the best way to determine whether or not a slate roof is right for you is to consider your goals and expectations when it comes to your roof. If you’re planning to stay in your home for a long time, slate can be the perfect option for your needs.

Roofing
Roofing Services

Things You Should Know About Roofing Repairs

Whether you are considering roofing repairs for your home or your office building, there are several things you should know before you begin. These include installing shingles, laying underlayment, and getting a professional roof inspection. Click here to learn more.Roofing

A roof inspection is a vital part of maintaining your home. Not only does it help protect the rest of your property from the elements, but it can also save you money. It’s a smart move to hire a qualified roofing professional to perform a thorough checkup.

During a roof inspection, the inspector will assess the materials used, the quality of installation, and any visible signs of damage. This is especially important if you’re planning to sell your home. Keeping your roof in good repair will ensure that your house looks its best for a potential buyer.

As well as looking at the roof itself, the inspector will look at your gutters and soffits. A roof without proper drainage can cause serious water damage. Also, a clogged gutter can lead to a leaky roof and could even exacerbate the problem.

If you have a roof that’s in need of a refresh, a spring tune-up can be a great time to remove the debris that’s accumulated over the winter. You should get your roof checked out after any significant storms, too.

While a roof inspection isn’t mandatory, it can make your life easier and prevent you from having to pay for costly repairs down the road. By identifying the smallest possible flaws, you’ll have more confidence in your roof’s ability to hold up over the years.

The best way to tell if your roof needs a major overhaul is to have a professional perform a test run. Roofing professionals can perform a number of tests, such as checking the strength of the roof’s structure, assessing the quality of the materials used, and making sure that the flashing and vent boots are in good working order.

An inspection will also help you discover minor issues, such as cracks in the roofing membrane. These may not seem like a big deal at first, but they can grow to be a bigger headache if ignored.

Getting a quality roof inspection can lead to a longer roof life, fewer repairs, and a healthier home. Having the roof inspected before a storm can help prevent damage, and the cost of repairs can be a fraction of the price of replacing the roof.

When it comes to laying shingles, there are a number of different methods to choose from. Whether you are installing architectural or standard shingles, you want to make sure you are getting the most out of your investment. For example, you can apply a water shield over your roof to protect from potential ice damming and leaks.

Aside from the obvious, you also want to make sure you are installing a waterproof underlayment. This can be an ice and water shield or a felt paper underlayment. Both of these are designed to provide temporary weather protection. The ice and water shield should be laid over the bottom two or three rows of shingles, while the felt paper underlayment should extend 24 inches beyond the exterior wall line.

If your roof has a valley, you’ll need to make sure you’re putting in the right shingles. For starters, you’ll need to cut a half-tab off the left side of the gable roof.

You’ll also want to install a starter row of shingles. These may be rolls of strip material, or they could be special shingles. They should be cut to the same size as your ridge shingles. In some communities, you can actually install three layers of shingles, which will help your roof last longer.

You can also use metal flashing. Usually, metal flashing is installed over the upper shingles. It’s designed to form an extra layer of protection over the valley seam.

Using a chalk line is a good way to ensure that your shingles are straight and square. There are also many different shingle-laying tools out there to help you. Make sure you have the proper equipment, like a good nail gun with a lower air compressor, to ensure that you’re using the best tool for the job.

Another thing to keep in mind is the length of your shingles. You don’t want to have to cut a half-tab off the bottom of a gable if you don’t have to.

Once you’ve finished laying the shingles, you can begin to seal the gaps. Make sure you’re not nailing the nails too close to the center of the shingle. Nails should be driven about a half inch from the edge of the shingle.

roof installation
Roofing Services

Protecting Valuable Items During Roof Installation

A new roof is a big investment, and getting it installed is a wonderful experience. However, you will need to protect any valuable items stored in the attic during the installation. Despite the excitement of getting a new roof, you will want to protect these items by covering them with old sheets or drop cloths. Small debris that falls from the roof may cause scratches on your paint, so it is important to keep valuables safe and out of the way.roof installation

A professional roofing contractor like Roofing will design the overall structure of the roof, which consists of rafters and trusses. These elements need to be positioned properly to evenly distribute the weight. Improper placement of these pieces will result in roofing problems later on. Make sure the installation contractor follows these guidelines to avoid these problems. If not, you may end up paying for the roof repairs in the future. However, a quality roof installation will last for decades, and it will make your home look better than ever.

After you have decided which type of metal roof to install, you can begin the installation process by installing a string line at the base of the peak. This string line will help you keep your overhang equal. Most homes are not perfectly square, so minor adjustments may be necessary. Once you have decided on a roof installation style, measure the overhang from end to end. The shingles should have three tabs. Once you’ve done this, you are ready to start applying the shingles.

Before allowing roofing workers to begin work, you should notify your neighbors. Construction during the tear-off of your old roof will create loud noises that can disturb your neighbors. Make arrangements for someone to watch your children while construction takes place. You may also want to consider the noise of the hammering and banging that will occur during the installation. The construction will cause vibrations that can cause fragile objects to fall. You should move valuable items to a safe place before the installation process begins.

The next step in a roof installation is the application of underlayment and flashing. It is critical that you apply underlayment before the shingles are installed. You can use self-stick adhesive or tarp to protect your landscaping from the ice and water. However, do not use home-center silicone because it will not last long. Professionals prefer polyurethane sealant formulations. This will protect the shingles from water damage and help prevent rust.

Depending on your needs, there are different types of roofing. Built-up roofs are popular for commercial buildings. They are ideal for areas that have heavy foot traffic or machinery. They are made up of multiple layers of hot asphalt, roofing felt, and flood coat asphalt. These roofs are strong and durable, but their installation is complicated. They involve several steps, including proper adhesive setting. If they are not installed properly, they may peel back and fail over time.

When choosing a roofing contractor, it is imperative to thoroughly assess your roof. Ask for references, and visit the previous clients of the company. Confirm with these customers that the company has experience with the type of roofing you are looking for. You should also ask for samples of materials and check the contractor’s background before selecting a company. Also, make sure to check whether the contractor has the necessary licenses and insurance. Finally, it is important to ask the contractor about the costs involved.

Before hiring a roofing contractor, a roofer will inspect the structure. They will determine if the roof material is still in good shape and how much longer it will take to complete the installation. They may recommend replacing the old roof sheathing before installing a new one. They may also recommend removing any upper-floor items in order to decrease the risk of falling glass and other items. Also, consider the safety of your family during the installation process. Many roofing nails may break a tire or even cause serious injury if they fall.

During the installation process, all workers on the ground should wear hard hats. Even careful workers can accidentally drop tools from the roof. Therefore, it is vital to use a safety harness when working on steep roofs. You should also ensure that you have purchased a fall protection kit, which you can buy at home centers for around $100. As well as protective gear, make sure you wear soft-soled shoes and keep the roof clean.

Asphalt

How To Find The Best Asphalt Repair Equipment Patch Mix

Professional asphalt contractors always look for new equipment like rollers, heaters, and other tools and equipment that make their work easier and faster. One such tool is an asphalt repair machine. There are many kinds of asphalt repair machines that are available in the market today. You can Visit Website before choosing the right equipment to identify the purpose of buying them.asphalt repair equipment

An asphalt repair machine is usually used to repair damaged asphalt pavements, cracks in the pavement, and drainage problems in driveways, walkways, and parking lots. They are used primarily for commercial and industrial applications but they are also used by residential asphalt maintenance contractors for pothole repairs. By using an asphalt rectifier, you could easily re-use an existing asphalt pavement and save on expenses by using only a small fraction of brand new asphalt hot mix. The asphalt repair equipment includes repair trucks, machines, and repair material.

Some of the most common asphalt repair equipment used today are the hot boxes or heaters. Hot boxes or heaters work by applying pressure to the repaired area of the pavement by using heated water. This hot water then expands into the damaged area, which fuses with the natural molecules present in the asphalt. As a result, the repaired portion becomes smoother and more durable. Hot boxes or heaters can be operated with propane, natural gas, and propane. They are more expensive than other types of repair equipment because of the initial investment and fuel consumption.

Another important tool in the asphalt repair equipment arsenal is the asphalt hot box trailer. It is a lightweight, collapsible trailer equipped with a pressurized tank that carries asphalt hot box solution. This solution, composed of asphalt slurry and water, is spread over the repaired area by the trailer’s pump. After spreading, the hot box solution is allowed to cool, which hardens the asphalt mixture. The resulting slurry then feeds into the damaged area and compacting it while it is still soft, which gives it strength.

When it comes to concrete repair and concrete crack sealing applications, an essential piece of equipment is the oil jacket melting machine. This machine can quickly and easily melt thick layers of concrete without damaging the surface underneath. A special high-pressure nozzle attached to the machine blows compressed air through the melted mastic, which seeps into the cracks and cures into the concrete. An example of an oil jacket melting machine is a Robosson Pumper, which is available at many home improvement centers.

Some examples of other types of asphalt repair equipment include air guns, stud finders, and punchers. Air guns are used to detect weak areas of concrete or the ground, and apply air blasts that bond with the problematic area. Meanwhile, a stud finder works by pointing straight up at the spot needing repair, and allowing the user to punch holes into the structure. Punching tools such as these can be a little more expensive than air jackets and oil jackets, but they do not require as much labor because they do not require spraying either.

An important piece of equipment for asphalt repairs is the infrared asphalt repair system. Infrared technology heats asphalt below its normal freezing point, which thins it out and forms a thick, even layer of asphalt. The infrared system heats asphalt by applying heat to it from below, which breaks down chemically bound hydrocarbon molecules in the asphalt layer. As the asphalt layer thins out, it becomes stronger, which allows the repair job to stretch further. Unlike traditional methods, an infrared asphalt repair system leaves a warm, translucent coating on the damaged area that penetrates further into the asphalt and forms a strong seal.

When looking for asphalt repair equipment patch mix, be sure to look for one containing all-weather performance, which means it can handle rain, sleet, and snow in the same way. This will save workers’ valuable time and money in the long run, since potholes caused by ice and snow are more difficult to fix with cold patch material than with asphalt that has already been damaged. It can also prevent additional damage to cars, trucks, and other property by repairing deep potholes before they become problematic. If you are going to invest in this equipment, choose from one of the best products available to ensure the best results for your business.